A smooth transition to the Stager push feed with Jeero

Stager has recently released a brand new push feed, which will eventually replace their legacy feed. This means that existing import scripts will stop working. The new push feed is faster and provides new types of information to be used on your website. Unfortunately, the push feed is also harder to integrate. You might wonder what this means for your website and how you can keep showing your precious Stager events on your website.

Don’t worry, Jeero has got you covered. Follow the steps below for a smooth transition to the push feed.

Why this matters

Switching to Stager’s new push feed with Jeero brings an immediate advantage: faster updates. With the old feed, updates to event information could take up to 45 minutes to appear on your website, leaving your audience potentially seeing outdated information. This delay could impact ticket sales and customer satisfaction, especially when dealing with time-sensitive updates like event time changes, sold-out notifications, or last-minute adjustments.

The push feed changes this entirely. Now, updates made in Stager are sent to Jeero in real-time, meaning your website reflects the latest information within minutes. This not only improves the experience for visitors but also provides peace of mind, knowing that your site is always current without the lag time. Additionally, the new feed includes more detailed information that you can leverage on your site to provide a richer experience for visitors.

Jeero makes this transition smoother by handling the technical side of the integration, allowing you to focus on creating a great event experience for your audience without hiring developers or spending hours troubleshooting.

About Jeero

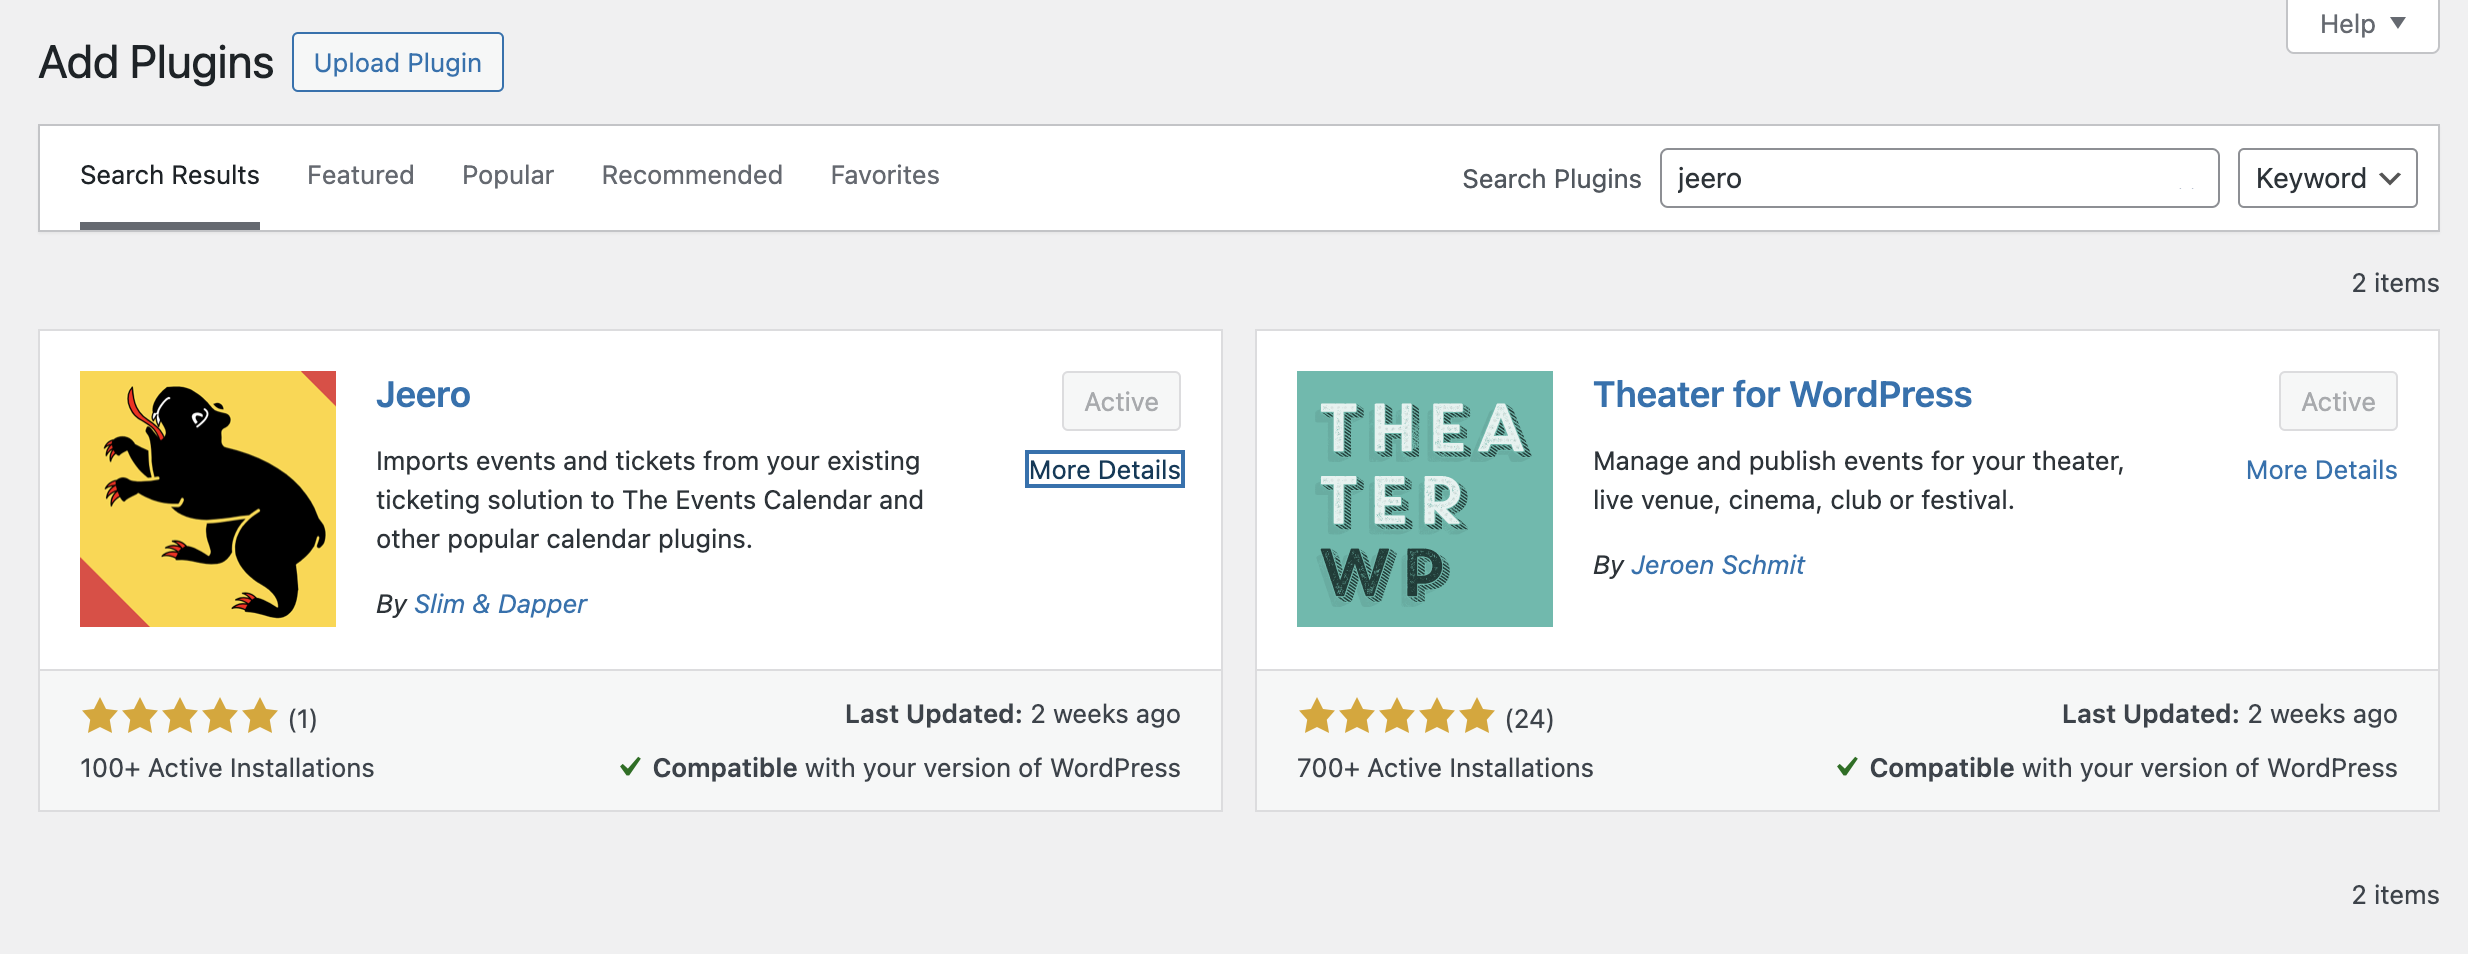
Jeero is a WordPress plugin that makes importing and updating event data from ticketing platforms like Stager simple and efficient. It helps keep your website current with minimal effort and no coding required.

What is your current situation?

I am currently using the Stager for WordPress plugin

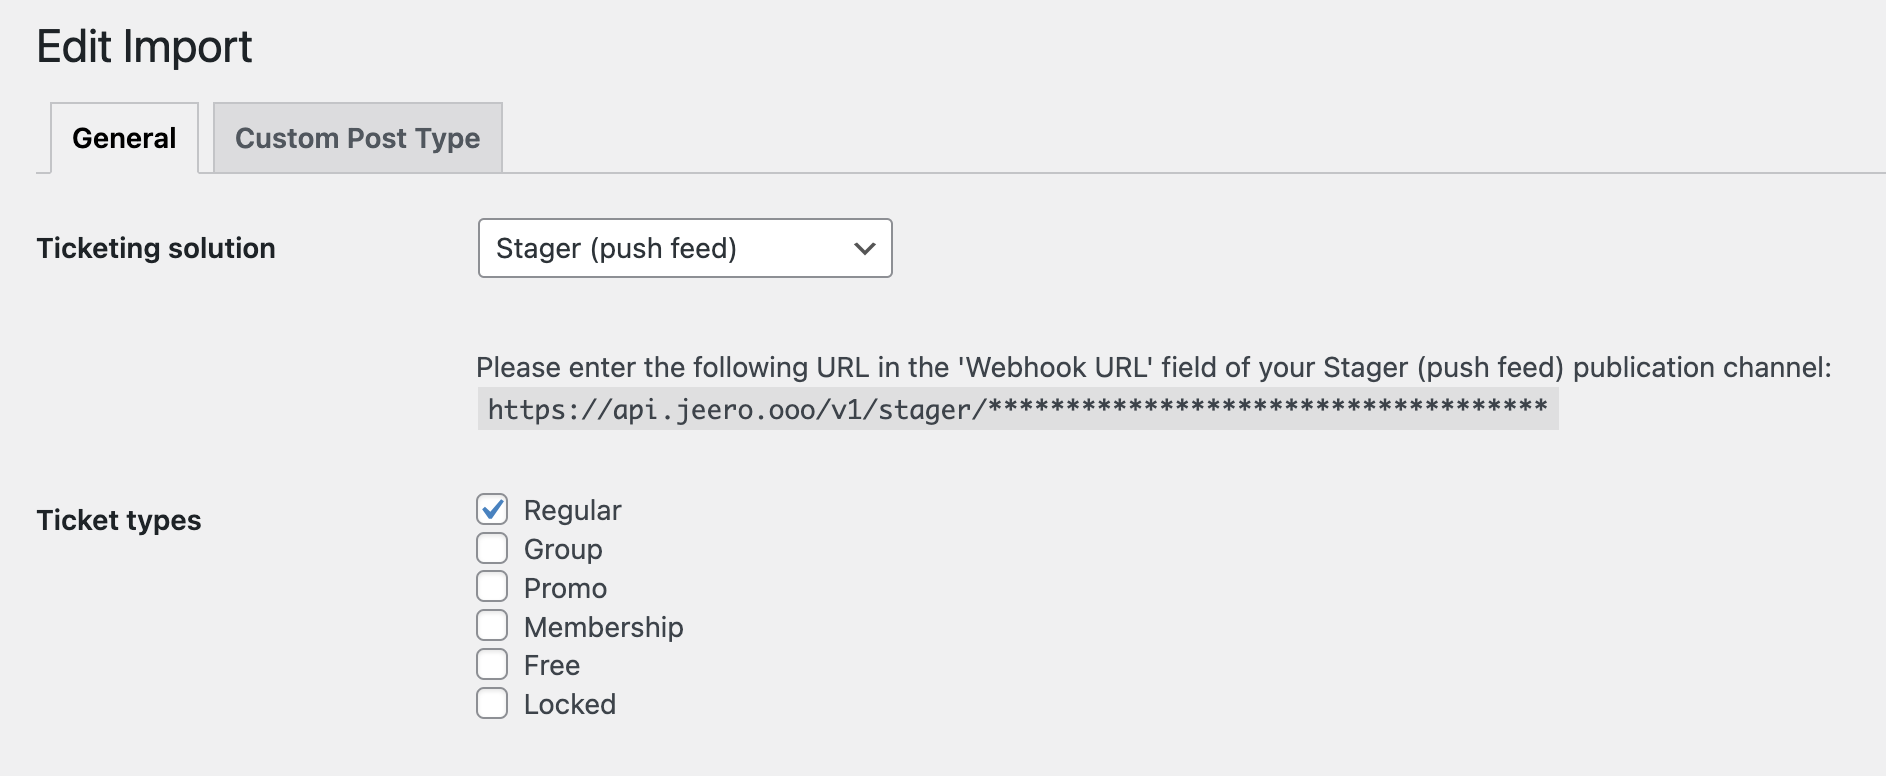
The Stager for WordPress plugin will not support the new Stager push feed. Let’s replace it with it’s successor: Jeero.

  1. Make a backup of your current website.
  2. In the WordPress admin, go to Plugins → Installed plugins.
  3. Deactivate the Stager for WordPress plugin. This stops the import from the old Stager feed.
  4. Download the Stager Migration Helper for Jeero plugin.
  5. Click on Add new plugin.
  6. Click on Upload plugin and upload the file that you downloaded in step 4.
  7. Activate the Stager Migration Helper for Jeero plugin. This will prepare all your previously imported events for the migration.
  8. Click on Add new plugin.
  9. Search for Jeero and install the Jeero plugin and activate it.

  10. Go to Jeero → Imports.
  11. Select Stager (push feed) in the ‘Ticketing solution’ field and click on ‘Save changes’.
  12. Copy the URL that appeared directly below the ‘Ticketing Solution’ field.

  13. Select the ticket types that your would like to import.
  14. Go to the Theater for WordPress tab.
  15. Check the Enable Theater for WordPress import checkbox and click on ‘Save Changes’.

  16. Go to your Stager backoffice.
  17. Go to Settings → Integrations and click on the publication channel that you want to use for the import. Usually this is the ‘Feed’ publication channel.
  18. Paste the URL from step 12. into the Webhook URL field and click on the ‘Save’ button.

    A screenshot of the 'Integrations' page in the Staging backstage area. It shows that you need to paste the URL from one of the previous steps into the 'Webhook URL' input field.
  19. Scroll down to the ‘Testing’ section and click on Send upcoming events. This will tell Jeero to import all your events to your website.

  20. Finally, in WordPress, go to Plugins → Installed plugins and remove the Stager for WordPress plugin and the Stager Migration Helper for Jeero plugin.

You now migrated your website import to the new Stager push feed.

However, since you are still on the free plan, Jeero only imports up to 10 upcoming Stager events. To start importing all your events, go to Upgrade Jeero and pick the plan that matches your number of upcoming Stager events.

By replacing the Stager for WordPress plugin with Jeero, you’re now connected to Stager’s faster, real-time push feed. With this setup, your events will appear on your website almost instantly, without relying on the outdated, slower feed. Remember, if you need to import more than 10 upcoming events, consider upgrading Jeero to fit your event volume.

I am already using the Jeero plugin

Nice! This should be easy then.

  1. Make a backup of your current website.
  2. Go to Jeero → Imports and click on your existing Stager import.
  3. Select Stager (push feed) in the ‘Ticketing solution’ field and click on ‘Save changes’.
  4. Copy the URL that appeared directly below the ‘Ticketing Solution field.

  5. Download the Stager Migration Helper for Jeero plugin.
  6. Click on Add new plugin.
  7. Click on Upload plugin and upload the file that you downloaded in step 4.
  8. Activate the Stager Migration Helper for Jeero plugin. This will prepare all your previously imported events for the migration.
  9. Go to your Stager backoffice.
  10. Go to Settings → Integrations and click on the publication channel that is use for the current import. Usually this is the ‘Feed’ publication channel.
  11. Paste the URL from step 3. into the Webhook URL field and click on the ‘Save’ button.

    A screenshot of the 'Integrations' page in the Staging backstage area. It shows that you need to paste the URL from one of the previous steps into the 'Webhook URL' input field.
  12. Scroll down to the ‘Testing’ section and click on Send upcoming events. This will tell Jeero to import all your events to your website.

You now migrated your website import to new Stager push feed.

Switching your Jeero plugin to the Stager push feed was quick and easy, thanks to Jeero’s built-in support. With this update, your event data is now refreshed in near real-time, ensuring visitors see the latest information without delay. If you’re still on Jeero’s free plan, you may want to upgrade to cover all your upcoming events.

I am using WordPress with a custom built import script

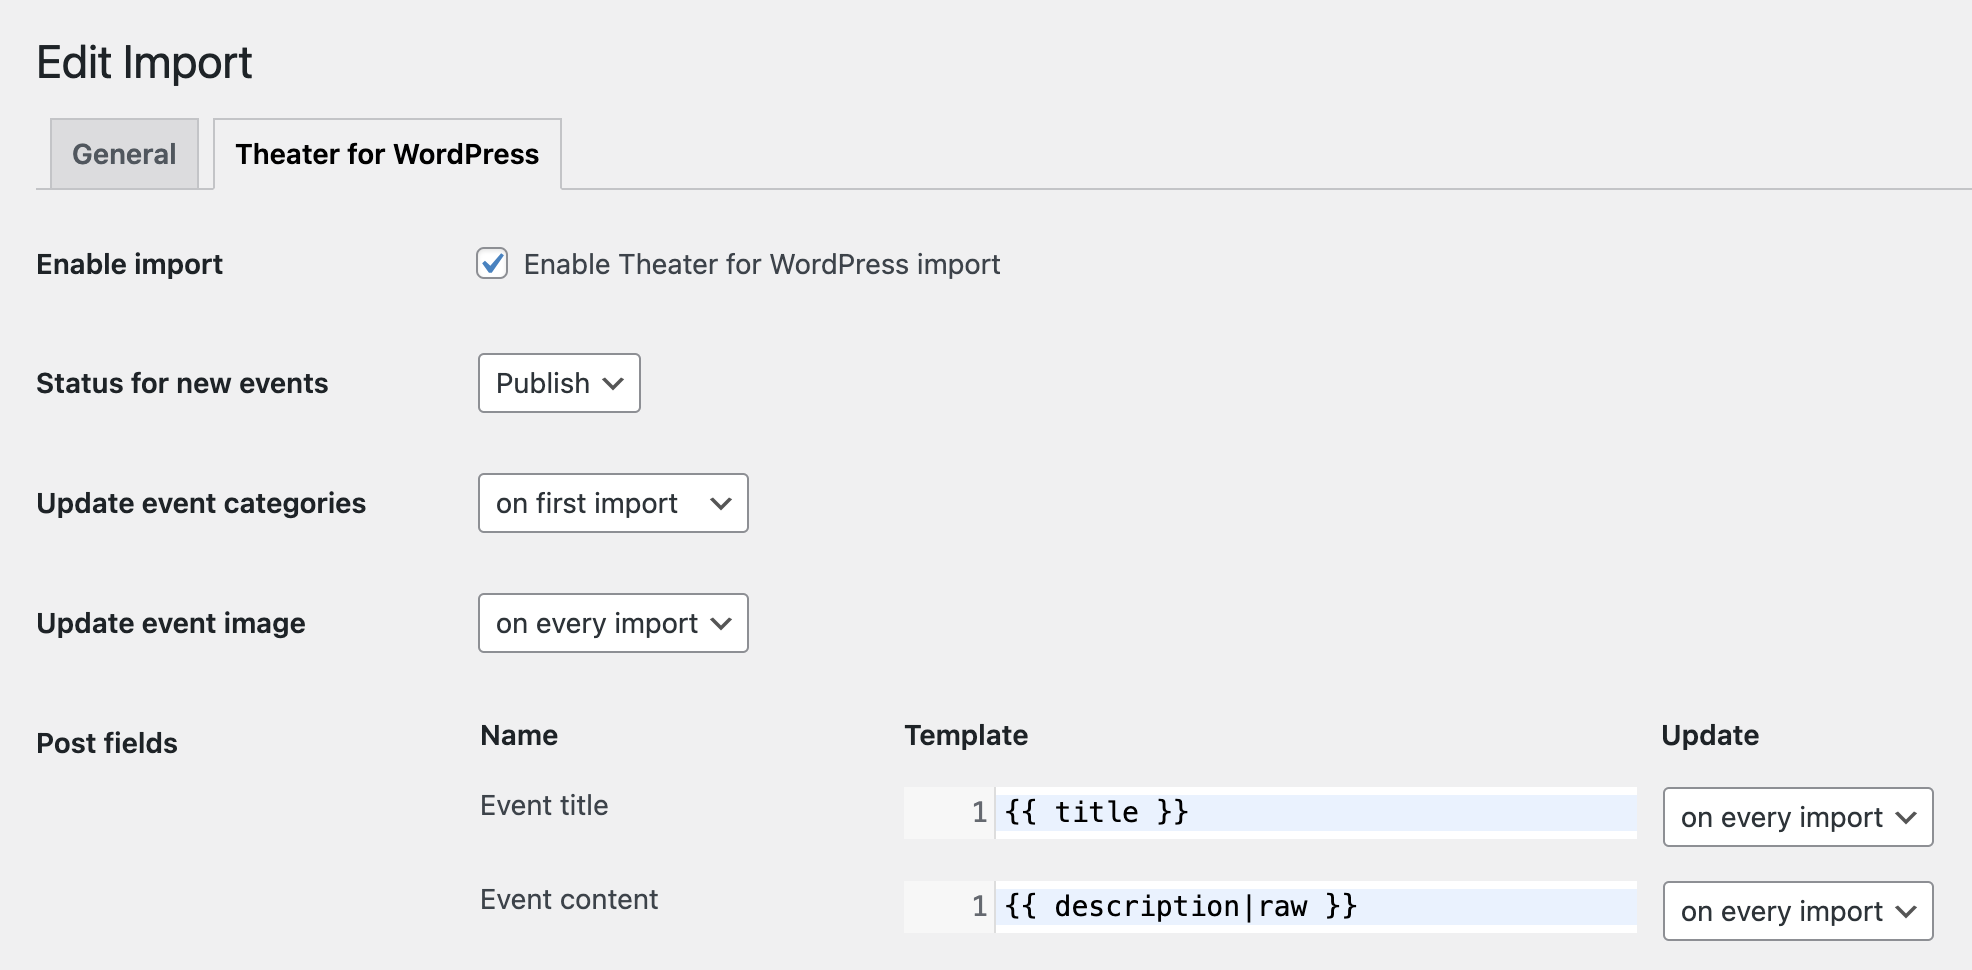
This probably means that your website uses a custom post type with custom fields for your events.

  1. Disable your existing import script.
  2. In the WordPress admin, go to Plugins → Installed plugins.
  3. Click on Add new plugin.
  4. Search for Jeero and install the Jeero plugin and activate it.

  5. Go to Jeero → Settings.
  6. Check the Enable import to Custom Post Types checkbox and click on ‘Save changes’.
  7. Go to Jeero → Imports.
  8. Select Stager (push feed) in the ‘Ticketing solution’ field and click on ‘Save changes’.
  9. Copy the URL that appeared directly below the ‘Ticketing Solution field.

  10. Select the ticket types that you would like to import.
  11. Go to the Custom Post Type tab.
  12. Check the Enable Custom Post Type import checkbox.

  13. Select your custom post type in the Post type for events dropdown.
  14. Scroll down to Custom fields and add all your custom fields. Use the directions for custom templates, directly below, to map the correct Stager fields to your custom fields. For example, you can add an custom fields named ‘Startdate’ and set the template to ‘{{ start }}’.
  15. Click on ‘Save Changes’.
  16. Go to your Stager backoffice.
  17. Go to Settings → Integrations and click on the publication channel that is used for the current import. Usually this is the ‘Feed’ publication channel.
  18. Paste the URL from step 8. into the Webhook URL field and click on the ‘Save’ button.

    A screenshot of the 'Integrations' page in the Staging backstage area. It shows that you need to paste the URL from one of the previous steps into the 'Webhook URL' input field.
  19. Scroll down to the ‘Testing’ section and click on Send upcoming events. This will tell Jeero to import all your events to your website.

You now migrated your website import to the new Stager push feed.

However, since you are still on the free plan, Jeero only imports up to 10 upcoming Stager events. To start importing all your events, go to Upgrade Jeero and pick the plan that matches your number of upcoming Stager events.

By migrating from your custom import script to Jeero, you gain access to the Stager push feed with full compatibility for your custom post types and fields. This means your events will now update in near real-time without the need for custom code. Don’t forget to upgrade Jeero if you have more than 10 upcoming events to keep your entire schedule up to date.

I am not using WordPress

That’s a little bit more tricky. Please contact me, so I can have a look and provide you with a possible approach: jeroen@slimndap.com.

Jeero can still support your needs, even if you’re not using WordPress. Reach out, and I’ll provide guidance tailored to your setup to ensure a seamless transition to the Stager push feed for fast, accurate event updates.

I stil have questions

How long does it take for my Stager events to appear in WordPress?

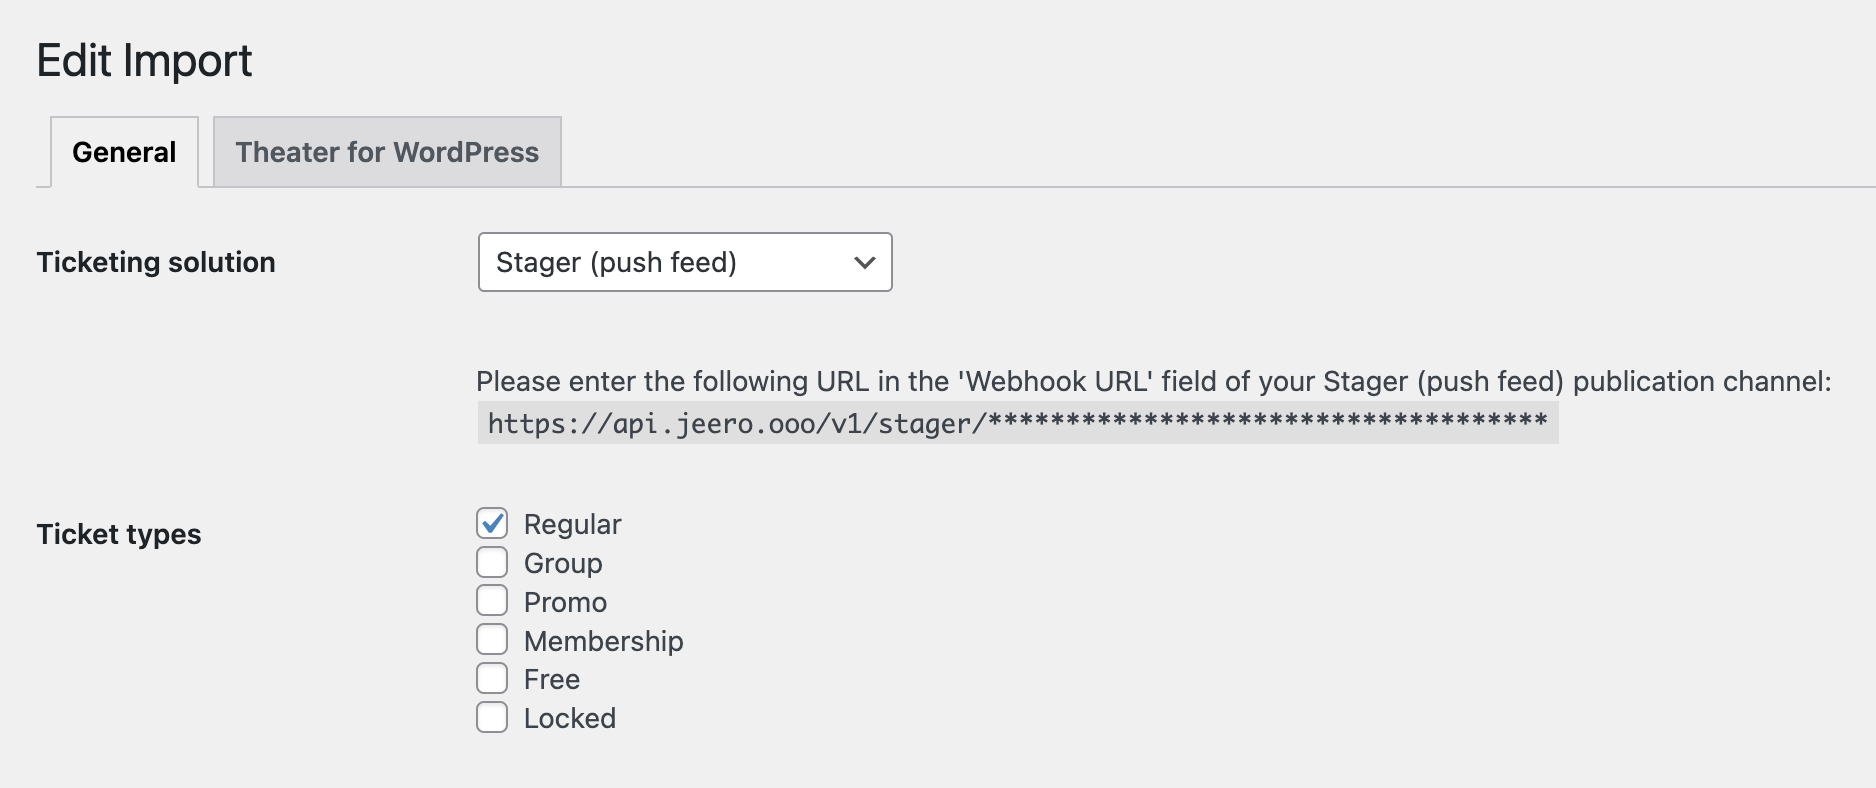
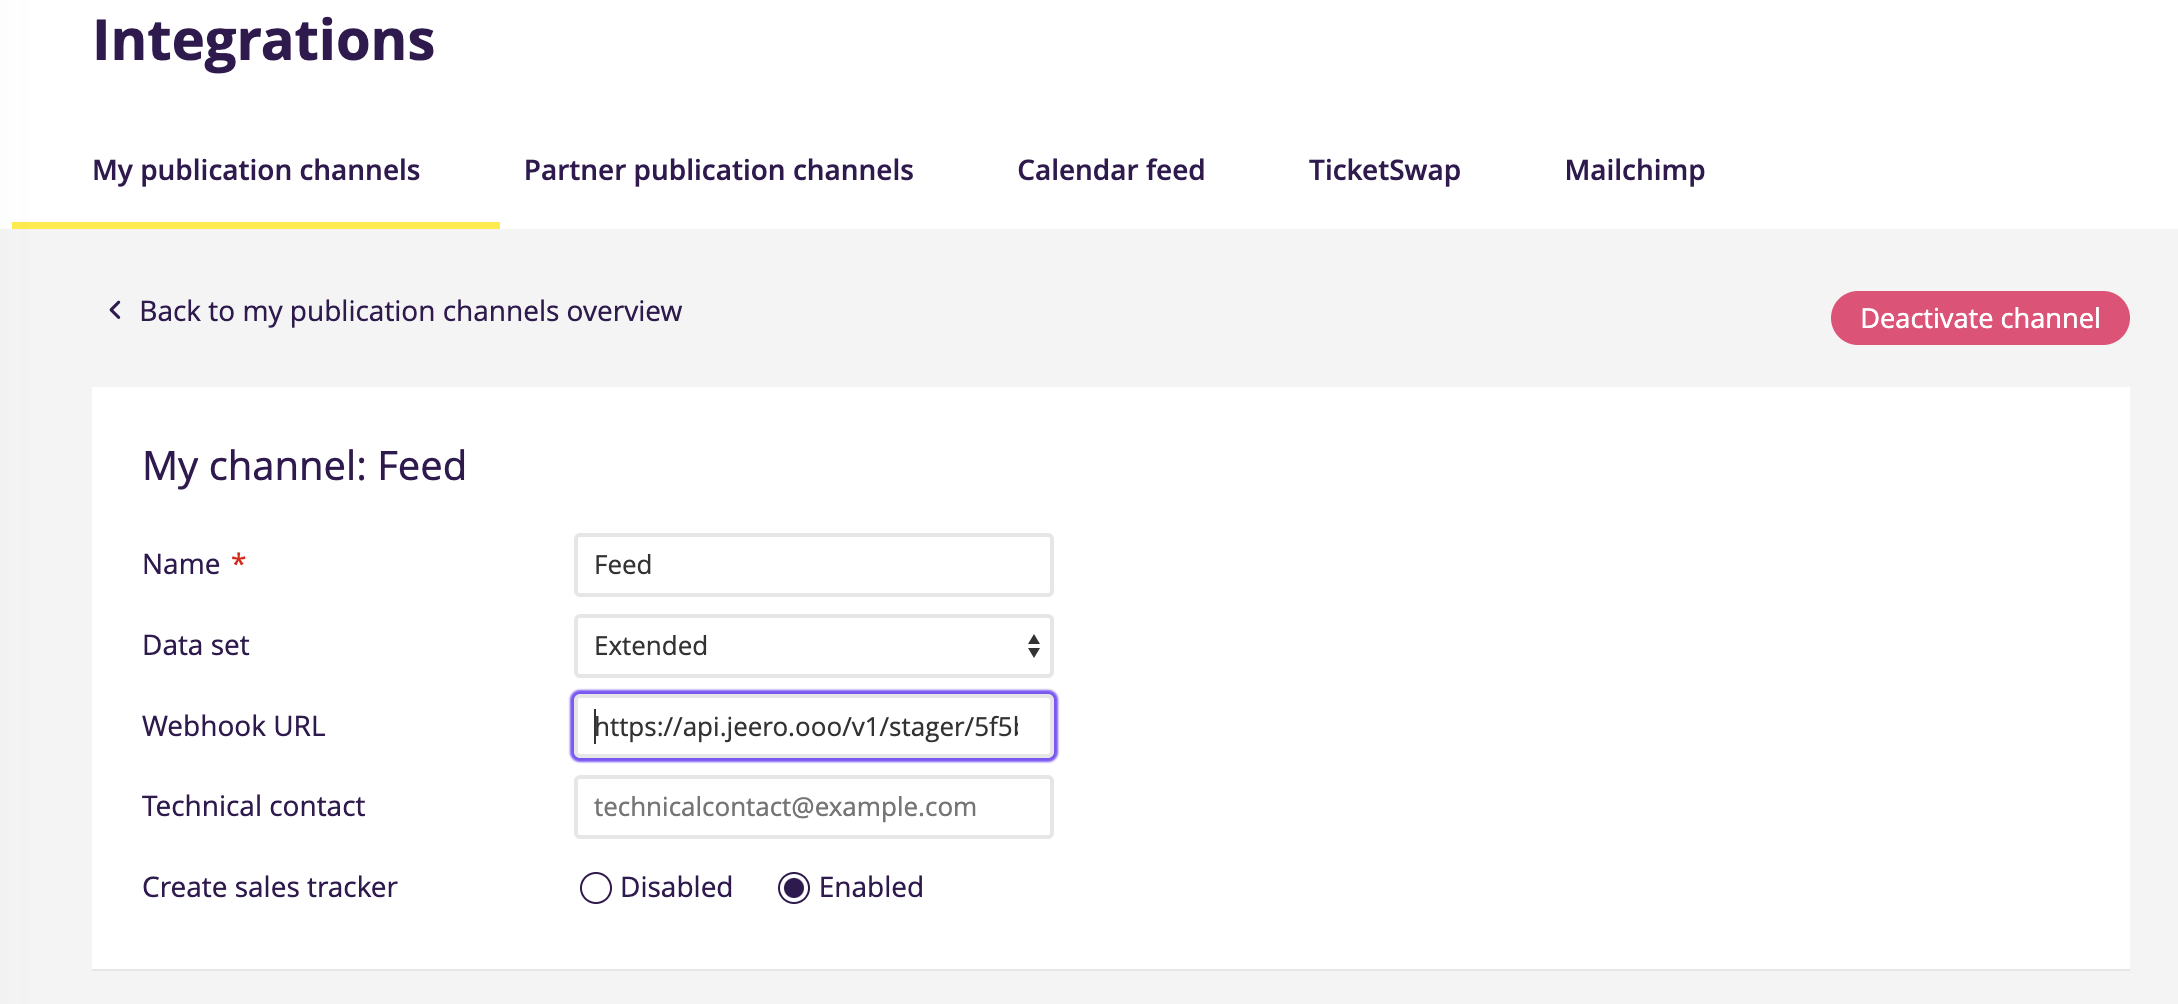
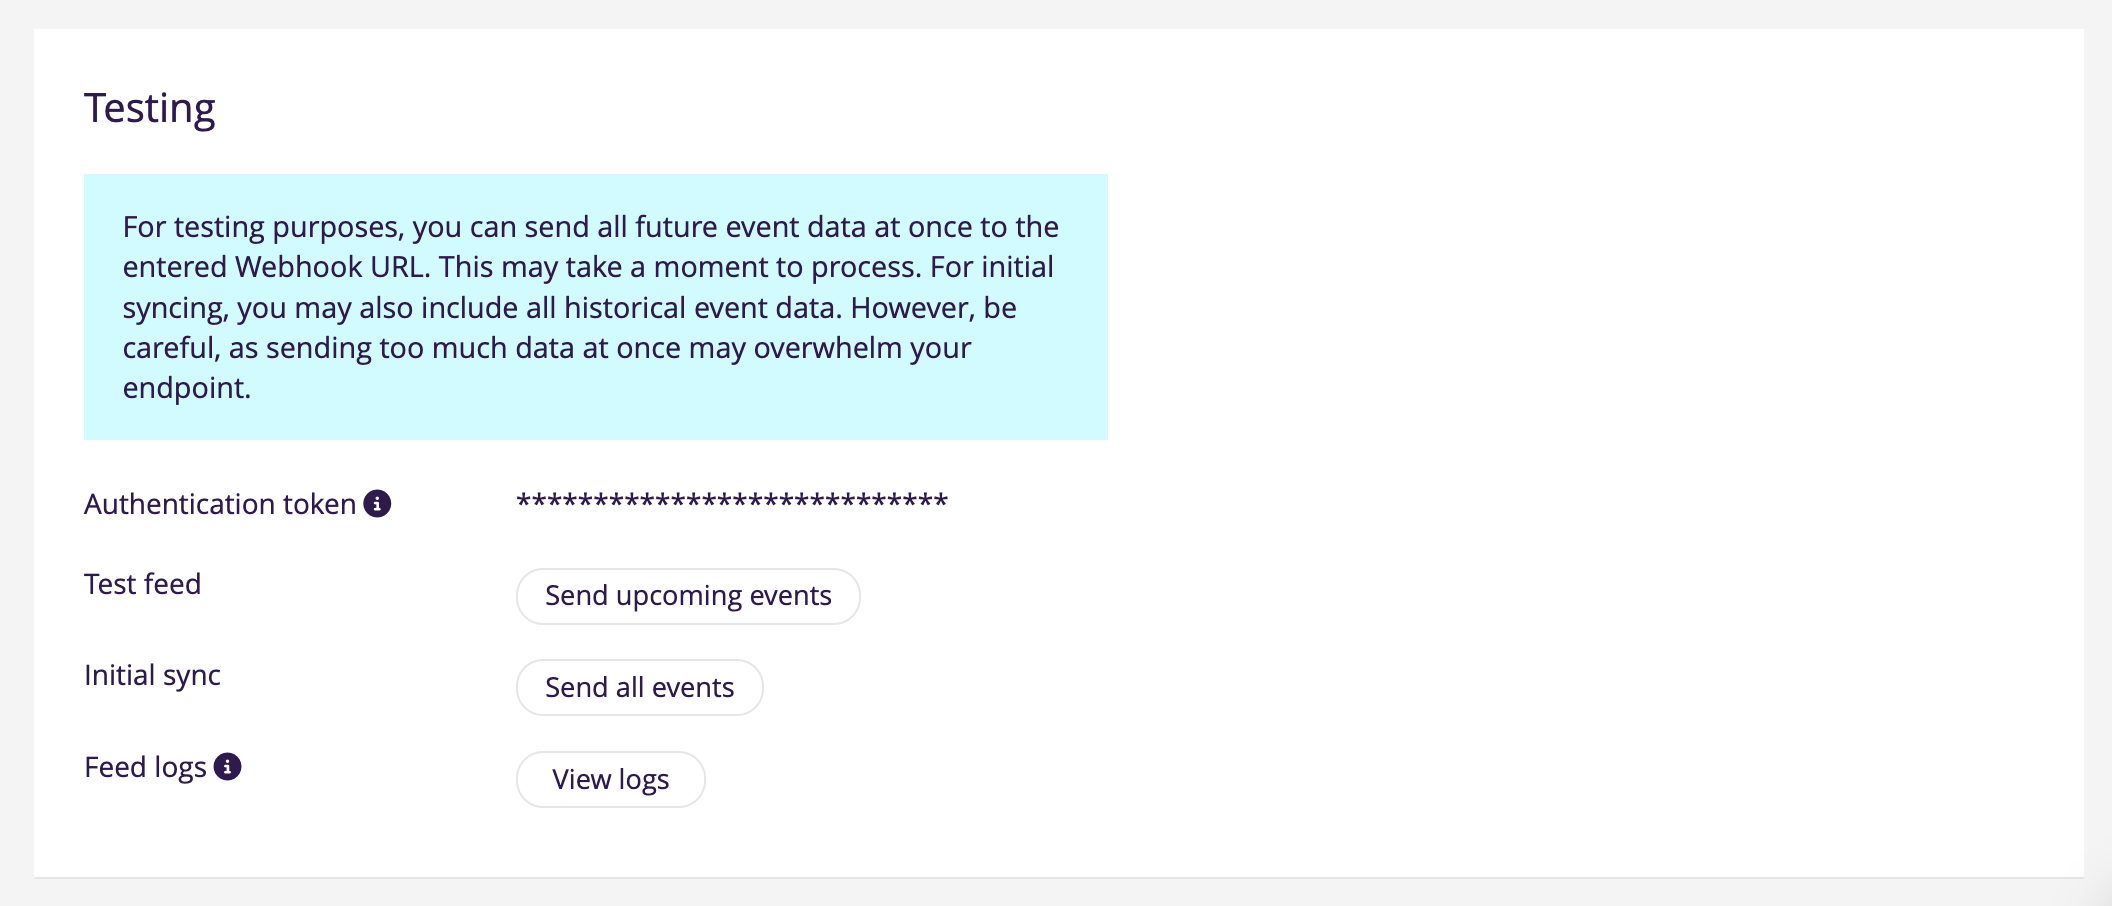
The new Stager push feed send a notification to Jeero whenever an event has changed in Stager. Jeero then imports the updated event within a couple of minutes.

Additionally, you can use the ‘Send all data’ button inside the ‘Integrations’ section of Stager. This will tell Jeero to import all your events. This process takes 5 – 10 minuten, depending on the number of upcoming events you have. Stager also triggers this process automatically every night.

How can I check if the import is working?

  1. Change the title of an event in Stager. Make sure the event is in the future and is published to the feed.
  2. Wait a couple of minutes.
  3. Check your event in WordPress to see if the title is updated.

Can you help me?

Yes I can! You can contact me at jeroen@slimndap.com.

Is your ticketing solution missing?

Please contact me so I can add your ticketing solution too.